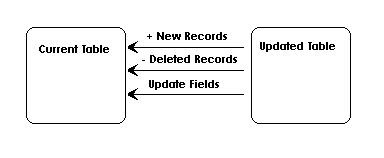
The CakePHP Set Class is a wonderful collection of functions that allow you to handle and process CakePHP arrays quickly and efficiently. It has features that deal with stripping out data, changing arrays to objects, and custom merge functionality.
Recently however I had a problem that was bothering me, and I thought some sort of set functionality would do the job. (Please tell me if this functionality has already been written).
Here's the problem:
I have a table that I download periodically and I want to update it into my database. The problem is that I have custom ID's for each row of my current table that are indexed throughout the rest of the database. I've found that I need to update existing records, delete any records that are not in my downloaded table, and I need to add new records that don't exist in my current table.
Here's an example:
On a regular basis, you get a list of 5000 products that your online store promotes from your affiliate. Once a week you need to download all of the products and update your products table. A standard drop and re-insert will not work, because you use custom id's in your products table that are referenced in your customers_products table and others. How do you update these 5000 records?
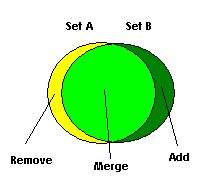
The answer is to think of it in terms of sets...
In the diagram, Set A is my current table that I want to update. Set B is the new table. Everything that is in Set A and not in Set B, I want to delete (Yellow). Everything in Set B not in Set A, I want to insert (Dark Green). And Everything that exists in both I want to update (Light Green).
Breaking the problem into a sets will allow you to realize what you need to do. One way of looking at a possible solution is to find what you need. From the diagram, all you need is everything in green (light or dark). In our product example all you need is a set of new products while maintaining the light green Primary Keys. (the dark green will generate new id's).
Implementation:
function updateProducts() {
$products= $this->Product->query("select distinct(prodid) as `match_id` from import_products as `Product`");
// Make the products array look like cake arrays...
foreach($products as $i => $product) {
foreach($product as $model=>$this_data) {
unset($products[$i][$model]);
$products[$i]['Product'] = $this_data;
}
}
$current_products = $this->Product->find('all',array('recursive'=>-1));
$res = $this->overlay($current_products, $products, "{n}.product.match_id");
$this->Product->query("truncate table products");
$this->Product->saveAll($res);
}
// function overlay:
// This function returns the $to array with merged $from elements.
// $from - array[0..x] of cake based array structure
// $to - array[0..x] of cake based array structure
// Path field for the overlay using set::extract's strucure
// eg. $path = "{n}.TableName.fieldname"
// * the Path must exist in each element in the $to and $from array
function overlay($from, $to, $path) {
$from_ary = Set::extract($from, $path);
$to_ary = Set::extract($to, $path);
if (count($to_ary) != count($to)) return $to;
if (count($from_ary) != count($from)) return $to;
$flipped_from = array_flip($from_ary);
$cnt = 0;
$results = array();
foreach($to as $key => $val) {
if (!empty($flipped_from[$to_ary[$cnt]])) {
$fkey = $flipped_from[$to_ary[$cnt]];
$results[$cnt] = Set::merge($from[$fkey], $to[$cnt]);
} else {
$results[$cnt] = $to[$cnt];
}
$cnt++;
}
return $results;
}
What does all this do?
Put simply, I gather my SET B (the new updated products that I downloaded), and then my SET B (my current set of products). I then call my function overlay(). Overlay simply returns SET B with elements from SET A merged with it based on the Path field. What is nice about this concept is that it allows you to simply pass the results overlay() directly to a cake saveAll() function.
I would not suggest using this code for giant tables. I did it on a zip code table with 42000 records, and the saveAll took a few minutes to rebuild the table. This may not be the most efficient solution, but it's clean and useful for "once-in-a-while" updates on tables.
Wednesday, April 22, 2009
Thursday, February 19, 2009
How to Add CAPTCHA Security Images to Wildflower Comments
So you love Wildflower CMS for CakePHP, and you've used it to create a number of blogs. However you've noticed something. You are getting comment spammed.
Put simply, Wildflower doesn't have a good solution for preventing comment spam.
Initial Setup
1) Download the latest Wildflower development copy to your system. You can find the latest code for Wildflower on GitHub.
2) Set up your development environment. This includes:
Download Securimage CAPTCHA
You can download Securimage here:
Securimage Download
RewriteEngine On
RewriteRule ^img/captcha.jpg$ captcha.php [QSA,L]
RewriteCond %{REQUEST_FILENAME} !-d
...
Create the Form View
Copy
$form->input('url', array('label' => 'Website URL (optional)')),
$form->input('content', array('label' => 'Message', 'type' => 'textbox')),
$html->image('captcha.jpg', array('alt'=>'Code', 'id'=>'security_image')),
$form->input('security_code', array('label' => 'Enter the word.')), $form->hidden('post_id', array('value' => $post['WildPost']['id'])),
Process the Form
public $validate = array(
'name' => VALID_NOT_EMPTY,
'email' => array('rule' => 'email', 'message' => 'Please enter a valid email address'),
'url' => array('rule' => 'url', 'message' => 'Please enter a valid URL', 'allowEmpty' => true),
'security_code' => array('rule'=>'validSecurityCode', 'message'=>'The word you entered was not correct.', 'allowEmpty' => false),
'content' => VALID_NOT_EMPTY
);
function validSecurityCode() {
if (!empty($this->data[$this->name]['security_code']) && strtolower($this->data[$this->name]['security_code']) != strtolower($_SESSION['securimage_code_value'])) {
unset($this->data[$this->name]['security_code']);
return false;
}
return true;
}
Try to add a comment to a blog post and see what happens.
Put simply, Wildflower doesn't have a good solution for preventing comment spam.
Initial Setup
1) Download the latest Wildflower development copy to your system. You can find the latest code for Wildflower on GitHub.
2) Set up your development environment. This includes:
- Apache virtual host setup to point to your wildflower/app/webroot folder
- Setup your local database called "wildflower"
- Modify your hosts file so that it points to the Apache domain
- Restart Apache.
Download Securimage CAPTCHA
You can download Securimage here:
Securimage Download
- Grab the zip file and unpack it into your app/vendors/ directory.
- Download the words.zip file and extract to app/vendors/securimage/words/
- Download the Captcha.php script and place it in app/webroot/
- Edit app/webroot/.htaccess and add the following line:
RewriteEngine On
RewriteRule ^img/captcha.jpg$ captcha.php [QSA,L]
RewriteCond %{REQUEST_FILENAME} !-d
...
Test the image by going to http://yourvirtualhost/img/captcha.jpg
Create the Form View
Copy
- ~/wildflower/views/wild_posts/view.ctp
- /app/views/plugins/wildflower/wild_psts/view.ctp
Now edit /app/views/plugins/wildflower/wild_psts/view.ctp and add the following two lines in the Comments Form.
$form->input('url', array('label' => 'Website URL (optional)')),
$form->input('content', array('label' => 'Message', 'type' => 'textbox')),
$html->image('captcha.jpg', array('alt'=>'Code', 'id'=>'security_image')),
$form->input('security_code', array('label' => 'Enter the word.')), $form->hidden('post_id', array('value' => $post['WildPost']['id'])),
Process the Form
Open up ~/wildflower/models/wild_comment.php
Add the following Validation Rule:
public $validate = array(
'name' => VALID_NOT_EMPTY,
'email' => array('rule' => 'email', 'message' => 'Please enter a valid email address'),
'url' => array('rule' => 'url', 'message' => 'Please enter a valid URL', 'allowEmpty' => true),
'security_code' => array('rule'=>'validSecurityCode', 'message'=>'The word you entered was not correct.', 'allowEmpty' => false),
'content' => VALID_NOT_EMPTY
);
Add the following Function:
if (!empty($this->data[$this->name]['security_code']) && strtolower($this->data[$this->name]['security_code']) != strtolower($_SESSION['securimage_code_value'])) {
unset($this->data[$this->name]['security_code']);
return false;
}
return true;
}
Try to add a comment to a blog post and see what happens.
Thursday, February 12, 2009
Writing Bad Test Cases
So, you spend days and days writing test cases and you find out that they become more of a hassle than you expected. Here are some common mistakes in writing test cases which may help you in your test case development.
1) Your test case creates live data. When you do a quick test case to try to make sure your function works, sometimes you simply set it up to create a new record in your database. This can happen in several ways.
- You connect to a Live API with your test case. This could actually send credit card transactions, or send live records to your other application, which dilutes live data with fake records. This could lead to bad reporting in the long run.
- You connect to your live database to test your functions. This is a really bad idea. Make sure your connection string points to a test database or you may end up losing mission-critical data.
3) You make test cases depend on each other. This is a temptation that should be avoided. When you are running test cases, each function should be independent, even though test cases run linearly. You should not have one test function that presets data, and then assume that that function was called by the test suite.
For instance, let's say I have a test called testLoadUserData and that function loads user information into the variable $this->userdata for testing. Then under than I have a test for testShowUserData. It would be a mistake to assume that $this->userdata still exists in testShowUserData. Why? Because sometimes we comment out tests so the page doesn't take so long to load. This could breat testShowUserData if it depends on other tests. A better solution would be to write a loadVariables function and call it in each test case.
The goal of test cases is to help write modular functions. Often times poorly designed code will cause problems in developing test cases. If you write bad test cases, just consider it a learning experience, and keep at it until it works well.
Good code is poetic in nature.
Monday, February 09, 2009
5 Tips for Cake PHP Development
- Don't over-complicate your code.
- Work within the constraints of Cake.
- Make it work, then go back and make it work better.
- Skinny Controllers, fat models.
- Test Test Unit Test.
Friday, January 30, 2009
The Ultimate Windows PHP Development Environment
So, you are a PHP developer and you have windows. You've tried all kinds of different editors and setups on your system, but nothing works the way you want it to. Well, your answer is here. I've compiled a list of applications that are essential for PHP development.
Hardware
A Computer - Developers do not need fancy machines to develop. They just need something within the past few years that has enough ram to run modern browsers and a bunch of apps open at the same time. I would suggest a minimum Windows XP. Vista will do as well.
2 Monitors - While a single monitor is nice, having a large area to work is also very helpful. What I suggest is adding a video card that supports two monitors. Then plug the monitors in side by side, and configure them.
The reason I suggest 2 monitors rather than having a wide-screen display is because I would suggest that you virtually stack your monitors so that one screen is virtually "above" another.
Why above one another? Simple. Programmers are lazy! 1) By having your monitors placed above one another you simply need to slide the mouse up to get to the second screen. The advantage of this is that the mouse never needs to leave the mouse pad. 2) Having the monitors setup side-by-side makes closing programs more difficult. If I have my browser maximized on screen 1 and I use the mouse to close it, I move the mouse to the right wall, go up to the x and click it.
Basic Software Tools
Browser(s) - Of course you need a browser or two. Being a PHP programmer doesn't always require that you have awesome xhtml/css design skills, but it's worth at least having several different browsers available to test your system on. There are a number of options available, however a simple set of browsers would be most useful.
The Applications
PHP, MySQL, Apache - This is commonly known (on windows) as WAMP installation. You will need three basic applications for 90% of your PHP development.
Xampp is an easy installation process that installs a fully working and functional WAMP server onto your system. It comes with a handy little control panel to allow you to stop and restart the apache and mysql processes. Not only that, it comes with PHPMyAdmin pre-installed to allow you to quickly get your database up and running. Note: Besides the default install, I would suggest making one additional modification to your xampp install. Open C:\xampp\apache\conf\httpd.conf in your favorite editor (Notepadd++ of course) and uncomment the line that starts with "LoadModule rewrite_module"... around 118 or so. This will turn on Mod Rewrite to allow a number of applications work with/nice/urls.
Frameworks
CakePHP - A while back I spent some time looking into frameworks. Out of all the frameworks I came across, CakePHP stood out above all the rest as a fast, reliable, well-designed framework. After spending a year and a half writing code in CakePHP, I've found that it is one of the most flexible frameworks I've used. Since then I've released over 20 sites using CakePHP that get hundreds of thousands of unique visitors per month. It has bee completely stable and reliable. It also has a growing community of developers who are constantly coming up with different uses, plugins, and add-ons.
Forgive me for not adding other frameworks, but feel free to explore your own.
Useful Utilities
VirtuaWin - This is a Must have. I keep a copy of this program on a zip drive in my wallet and install it on any computer that I'm using. Basically VirtuaWin allows you to have up to 20 desktops on your computer. You setup your shortcut key () to navigate to the desktop you are working. This allows me to work on several projects at the same time along with having one reserved for email and music controls. Once you use this, you'll never go back to a single desktop. Plus if you have dual monitors, you double your desktop capacity up to 40! Yikes!
CoreFTPLite - Of course you need an extra FTP utility. I found that Core FTP Lite does everything I want it to do. Fast loading, fast transfers, SFTP, doesn't crash, easy to use, etc. What else can you say? Filezilla is nice too.
Putty - Never go anywhere without putty. Putty is a small executable terminal window that allows you to ssh anywhere on the web. You don't install it, you just open it. I usually copy it to program files / putty and create shortcuts to it for consistancy.
RealVNC - If you have multiple windows computers and again you are too lazy to get up and log into that computer, VNC is the way to go. Vnc lets you open the desktop of another machine on your computer. It's a fairly simple setup, and works great.
Windows XP Tricks to save time - This is a video that suggests additional cool features to help you save time when programming on windows. I use a few of these techniques as well.
And Finally... The best for last...
Git
Git - I put git in its own category because it's so awesome and it is a must-have for ALL development. Git is a version control repository, but far better and faster than CVS or SVN. Git allows you to store snapshots of the files you are working on and easily recover bad changes. Take a look at one of my previous post about using Git with SVN for help in this area.
The End.
Hardware
A Computer - Developers do not need fancy machines to develop. They just need something within the past few years that has enough ram to run modern browsers and a bunch of apps open at the same time. I would suggest a minimum Windows XP. Vista will do as well.
2 Monitors - While a single monitor is nice, having a large area to work is also very helpful. What I suggest is adding a video card that supports two monitors. Then plug the monitors in side by side, and configure them.
The reason I suggest 2 monitors rather than having a wide-screen display is because I would suggest that you virtually stack your monitors so that one screen is virtually "above" another.
Why above one another? Simple. Programmers are lazy! 1) By having your monitors placed above one another you simply need to slide the mouse up to get to the second screen. The advantage of this is that the mouse never needs to leave the mouse pad. 2) Having the monitors setup side-by-side makes closing programs more difficult. If I have my browser maximized on screen 1 and I use the mouse to close it, I move the mouse to the right wall, go up to the x and click it.
Basic Software Tools
Browser(s) - Of course you need a browser or two. Being a PHP programmer doesn't always require that you have awesome xhtml/css design skills, but it's worth at least having several different browsers available to test your system on. There are a number of options available, however a simple set of browsers would be most useful.
- Firefox - This is a Must! If you don't use firefox the only excuse you have is to be using Google Chrome. Other than that, there is No excuse. Firefox has a few nice extensions that make web programming helpful. Often times we will need to integrate PHP back-end with Ajax, or something. For testing purposes in this situation, it would be helpful to add Firefox Firebug.
- Google Chrome - As mentioned earlier, Google Chrome is a good alternate to firefox. It is still relitavely new, but has some good potential.
- Internet Explorer - Ok, yes you need it. Not for browsing, but for testing. It is useless to have a site that looks great on Firefox when 90% of your users are using Internet Explorer. In addition to this it is important that you have multiple versions of IE. I would highly suggest: Multiple IE.
- Notepad++ - This is by far the best editor I've used in a long time, and it is my favorite. Why you may ask? I judge editors by a number of factors. 1) How little memory they use 2) Easy to use Tabs 3) Highlighting 4) Useful features. Notepadd++ has ranked #1 for all of these factors in my book. Here are a few things I like about it.
- The Light Explorer plugin makes browsing my directories quick and easy.
- It comes with the ability to edit files directly on a web server through the ftp_syncronize plugin
- It opens very fast, takes very little memory, has nice highlighting, and tabs at the top.
- It opens and closes function tabs letting me see only the code I'm working on at the time. - gvim for Windows - Before coming across Notepad++ I used gvim for windows exclusively. Why? Having a background of using the command line, I learned Vi. When you ssh over to a server and need to edit a file, Vi is by far the best editor (sorry emacs lovers). Well, since I'm always using :wq or %s/.../../g and other vi commands, I found that using VI in a windows environment was great. It allowed me to quickly edit files and use my favorite vi commands.
Why did I switch? Mainly because of tabs. While I know the basics of VI, I never could setup a good solution for adding and managing tabs. I know there is a VI solution, but I fell to the temptation of opening 10+ Vi windows while working on a project. The transition to Notepad++ was a careful one, but I still keep Vi around.
Why should you consider keeping Vi around?
- It again is light weight and fast.
- It offers nice highlighting.
- It's VI! So you have the great features of VI.
What can you use it for?
- Various projects with CSV Files or Excel files. For instance you can turn an excel sheet into a csv file by copying the data to VI and running the following command:
%s/\t/,/g
- Vim is great and fast for formatting data quickly and on the fly.
- The latest version of VI can open very large files quickly.
Oh, and don't forget, it's VI!
The Applications
PHP, MySQL, Apache - This is commonly known (on windows) as WAMP installation. You will need three basic applications for 90% of your PHP development.
- PHP - Of course you will need PHP. This is the application that you actually use to run the code you're developing. I would suggest keeping a browser open and making use of the PHP function search box on the top of the php site. I would not suggest installing php alone on your machine unless you have the time to configure it yourself. (see below for xampp installation)
- Apache - Apache is the most popular and most stable webserver out on the market. It is worth learning, because if you go to work for a new company, chances are that their web servers use apache. (again, see below for installation)
- MySQL - There are a number of databases out there, but by far, mysql is the best for mid or even high traffic sites. For many years it has been second to Oracle, but recent versions have made it highly competitive to Oracle. And of course, you can't beat the price
Xampp is an easy installation process that installs a fully working and functional WAMP server onto your system. It comes with a handy little control panel to allow you to stop and restart the apache and mysql processes. Not only that, it comes with PHPMyAdmin pre-installed to allow you to quickly get your database up and running. Note: Besides the default install, I would suggest making one additional modification to your xampp install. Open C:\xampp\apache\conf\httpd.conf in your favorite editor (Notepadd++ of course) and uncomment the line that starts with "LoadModule rewrite_module"... around 118 or so. This will turn on Mod Rewrite to allow a number of applications work with/nice/urls.
Frameworks
CakePHP - A while back I spent some time looking into frameworks. Out of all the frameworks I came across, CakePHP stood out above all the rest as a fast, reliable, well-designed framework. After spending a year and a half writing code in CakePHP, I've found that it is one of the most flexible frameworks I've used. Since then I've released over 20 sites using CakePHP that get hundreds of thousands of unique visitors per month. It has bee completely stable and reliable. It also has a growing community of developers who are constantly coming up with different uses, plugins, and add-ons.
Forgive me for not adding other frameworks, but feel free to explore your own.
Useful Utilities
VirtuaWin - This is a Must have. I keep a copy of this program on a zip drive in my wallet and install it on any computer that I'm using. Basically VirtuaWin allows you to have up to 20 desktops on your computer. You setup your shortcut key (
CoreFTPLite - Of course you need an extra FTP utility. I found that Core FTP Lite does everything I want it to do. Fast loading, fast transfers, SFTP, doesn't crash, easy to use, etc. What else can you say? Filezilla is nice too.
Putty - Never go anywhere without putty. Putty is a small executable terminal window that allows you to ssh anywhere on the web. You don't install it, you just open it. I usually copy it to program files / putty and create shortcuts to it for consistancy.
RealVNC - If you have multiple windows computers and again you are too lazy to get up and log into that computer, VNC is the way to go. Vnc lets you open the desktop of another machine on your computer. It's a fairly simple setup, and works great.
Windows XP Tricks to save time - This is a video that suggests additional cool features to help you save time when programming on windows. I use a few of these techniques as well.
And Finally... The best for last...
Git
Git - I put git in its own category because it's so awesome and it is a must-have for ALL development. Git is a version control repository, but far better and faster than CVS or SVN. Git allows you to store snapshots of the files you are working on and easily recover bad changes. Take a look at one of my previous post about using Git with SVN for help in this area.
Tuesday, January 27, 2009
Unit Testing Cookies in Cake PHP
One problem I came across when building unit tests was trying to check to see if my cookies were setup properly. (Yes I still use cookies.) The problem with trying to unit test a cookie in Cake PHP is that you are only allowed a single page load for the test. A cookie doesn't exist until it is sent to the browser and the browser sends the cookie back with a new page load.
My first thought was to place a conditional in the test case. This would basically be something like:
if (!empty($_COOKIE['id'])) {
$this->assertTrue($_COOKIE['id'] == 100);
}
This method would require you to have to reload the page to properly test cookies. The first page load will consist of 0 tests. The next page load will consist of 1 test. But this method didn't seem like the best way to go about it.
Then I discovered the PHP function: headers_list().
Headers List will return all the headers that you are about to send to the browser in an array format. This was the solution!
Now I can test what the function is expected to send to the browser (which is independent of the browser actually accepting the cookie or not). Here's a sample of what I did.
function testStoreCookie() {
$this->Controller->storeCookie(100);
$header_list = headers_list();
$cookie_true = false;
foreach($header_list as $item) {
$cookie_true = is_string(stristr($item, "Set-Cookie: id=100")) || $cookie_true;
}
$this->assertTrue($cookie_true);
}
There you have it! You can now test setting cookies without reloading the page.
Tuesday, January 20, 2009
Cheat Sheet Collection
Programming Cheat Sheets
Have you ever been programming and simply forgotten a command? When ever that has happened to me, I've had to go to google or the api website to find documentation, and many times that takes longer than I want. Then I discovered programming cheat sheets. Programming cheat sheets are ethical, time-saving, tree killing documents that have commonly used functions, procedures, commands, or examples to jog your memory when programming.
For your convenience, I've put together a zip file with 13 Cheat Sheets. Below is a description of some of the ones you will find in this collection.
You may download it here.
CakePHP Cheat Sheet
The CakePHP Cheat Sheet is helpful for all of your baking needs. It includes naming conventions, common model commands, controller commands, view commands, helper properties, globals, and component information.
Cake can be found at http://cakephp.org
HTML Character Sets
The HTML Character Set Cheat Sheet is quite useful for finding out what the & character is or for escaping "'s. Also it is useful when using template engines that have problems with characters like { or $.
HTML Color Chart Cheat Sheets
This is an essential for designers or when you are coding CSS on-the-fly. It is also useful when picking colors for a new website.
CSS Cheat Sheet
Most web designers have their favorite CSS documentation site bookmarked. Many use reference books to lookup css attributes. This cheat sheet is useful for both novice and experienced CSS'ers to serve as a reminder of the names of css attributes.
Git Cheat Sheet
Git is a great repository system that allows you to archive all of your work quickly, and be able to keep your large project organized. Similar to SVN or CVS, Git offers a local repository as well as public repositories for sharing code. The cheat sheet is very valuable as a reminder of what commands to use for using Git.
HTML Cheat Sheet
Are you often forgetting what HTML is able to do? This cheat sheet has a list of much of the markup that you may not normally use, as well as those old favorites.
Also included are:
Feel free to post additional cheat sheets in the comments section.
Have you ever been programming and simply forgotten a command? When ever that has happened to me, I've had to go to google or the api website to find documentation, and many times that takes longer than I want. Then I discovered programming cheat sheets. Programming cheat sheets are ethical, time-saving, tree killing documents that have commonly used functions, procedures, commands, or examples to jog your memory when programming.
For your convenience, I've put together a zip file with 13 Cheat Sheets. Below is a description of some of the ones you will find in this collection.
You may download it here.
CakePHP Cheat Sheet
The CakePHP Cheat Sheet is helpful for all of your baking needs. It includes naming conventions, common model commands, controller commands, view commands, helper properties, globals, and component information.
Cake can be found at http://cakephp.org
HTML Character Sets
The HTML Character Set Cheat Sheet is quite useful for finding out what the & character is or for escaping "'s. Also it is useful when using template engines that have problems with characters like { or $.
HTML Color Chart Cheat Sheets
This is an essential for designers or when you are coding CSS on-the-fly. It is also useful when picking colors for a new website.
CSS Cheat Sheet
Most web designers have their favorite CSS documentation site bookmarked. Many use reference books to lookup css attributes. This cheat sheet is useful for both novice and experienced CSS'ers to serve as a reminder of the names of css attributes.
Git Cheat Sheet
Git is a great repository system that allows you to archive all of your work quickly, and be able to keep your large project organized. Similar to SVN or CVS, Git offers a local repository as well as public repositories for sharing code. The cheat sheet is very valuable as a reminder of what commands to use for using Git.
HTML Cheat Sheet
Are you often forgetting what HTML is able to do? This cheat sheet has a list of much of the markup that you may not normally use, as well as those old favorites.
Also included are:
- Javascript Cheat Sheet
- Jquery Cheat Sheet
- Mysql Cheat Sheet
- Php Cheat Sheet
- Prototype Cheat Sheet
- Regular Expressions Cheat Sheet
Feel free to post additional cheat sheets in the comments section.
Friday, January 16, 2009
Four Ways To Retrieve Model Data
There are a number of ways (in addition to direct model access from a controller) to retrieve data from a model. The type of method you use depends on what you are attempting to do. Here is what I've discovered.
$uses array
As you recall, the standard way a controller defines its models is by using the variable $uses.
$uses = array('Post','Comment');
This works fine for most cases, but what happens if one action in your controller needs to use the UserNotes Model, but no other actions in the controller needs it. One way to solve this would be to simply throw it into the $uses array().
$uses = array('Post','Comment','UserNote');
Now in your controller action you can call $this->UserNote->find... to get the data you want to get.
ClassRegistry::init
Recently, after browsing through the regular CakePHP blogs, I came across an article about building a dashboard in CakePHP. This article introduced the available function called ClassRegistry::init(). I found it to be an interesting addition to my growing Cake PHP toolset. ClassRegistry::init() is the actual method that a controller uses to load its models (you can find the call in the cake controller class in the function loadModel).
When to use $uses and when to use ClassRegistry::init
There may be times when you do not want to use the $uses array. In the above example, UserNotes will be loaded for all of the actions (even the ones that never call it). This is a problem because the more models that that single action needs, the more strain it will put on all the other actions. The question of when to use ClassRegistry::init is: Are you willing to have all of the other actions suffer from the performance hit of loading unused models?
This is where ClassRegistry::init() comes in to play. ClassRegistry::init() will load a model directly, skipping the standard model caching, from within the action. This means only the action you are running at that moment will have UserNotes loaded. All of the other actions in that controller will not load that model.
function getUserComments() {
...
$userNote = ClassRegistry::init('UserNote');
$userNotes = $userNote->getUserNotes($user_id);
...
}
When should you use ClassRegistry::init?
Many times both of the previous methods can be avoided because of natural model linking. Remember, when you define a model, you also setup relationships. The controller/action can use those relationships to retrieve data, as seen in Mark Story's Blog post.
If you are requesting information from a joined table within the relational chain, calling models through their relationships would be the best methodology.
$uses = array('User');
...
$this->User->Notes->find('all');
Although this method is limited, it is powerful, and it prevents redundency. By default a model will load the models it is associated with. So when you want data from an associated table, don't bother defining it in the $uses array, because Cake will automagically load that model and make it available through your current model. The key to making this work effectively is good database design.
requestAction() a Last Resort
The tackiest way to retrieve model data is to use requestAction. The reason for this is because of how Cake works. As you can see from the diagram, the dispatcher determines the route and then loads a single controller along with its models. Using a request action will cause the dispatcher to run again (possibly re-running routes) and then loading your additional controller, along with its models. This can cause a performance hit without caching.
Inside your Users controller you have an action called show_notes(). show_notes needs to access the notes table and retrieve a list of notes.
// Users Controller
function show_notes() {
...
$notes = $this->requestAction('/notes/get_notes/'.$user_id);
}
// Notes Controller
function get_notes($user_id) {
return $this->findByUserId($user_id);
}
There are a number of problems with this type of design.
Put simply, there are plenty of options to retrieve model data. The method that you use truly depends on your specific problem that you are addressing.
$uses array
As you recall, the standard way a controller defines its models is by using the variable $uses.
$uses = array('Post','Comment');
This works fine for most cases, but what happens if one action in your controller needs to use the UserNotes Model, but no other actions in the controller needs it. One way to solve this would be to simply throw it into the $uses array().
$uses = array('Post','Comment','UserNote');
Now in your controller action you can call $this->UserNote->find... to get the data you want to get.
ClassRegistry::init
Recently, after browsing through the regular CakePHP blogs, I came across an article about building a dashboard in CakePHP. This article introduced the available function called ClassRegistry::init(). I found it to be an interesting addition to my growing Cake PHP toolset. ClassRegistry::init() is the actual method that a controller uses to load its models (you can find the call in the cake controller class in the function loadModel).
When to use $uses and when to use ClassRegistry::init
There may be times when you do not want to use the $uses array. In the above example, UserNotes will be loaded for all of the actions (even the ones that never call it). This is a problem because the more models that that single action needs, the more strain it will put on all the other actions. The question of when to use ClassRegistry::init is: Are you willing to have all of the other actions suffer from the performance hit of loading unused models?
This is where ClassRegistry::init() comes in to play. ClassRegistry::init() will load a model directly, skipping the standard model caching, from within the action. This means only the action you are running at that moment will have UserNotes loaded. All of the other actions in that controller will not load that model.
function getUserComments() {
...
$userNote = ClassRegistry::init('UserNote');
$userNotes = $userNote->getUserNotes($user_id);
...
}
When should you use ClassRegistry::init?
- When you have an action that calls models that other actions do not need.
- When you need to retrieve unrelated model data.
- When you want to skip model Caching and access the model directly.
Many times both of the previous methods can be avoided because of natural model linking. Remember, when you define a model, you also setup relationships. The controller/action can use those relationships to retrieve data, as seen in Mark Story's Blog post.
If you are requesting information from a joined table within the relational chain, calling models through their relationships would be the best methodology.
$uses = array('User');
...
$this->User->Notes->find('all');
Although this method is limited, it is powerful, and it prevents redundency. By default a model will load the models it is associated with. So when you want data from an associated table, don't bother defining it in the $uses array, because Cake will automagically load that model and make it available through your current model. The key to making this work effectively is good database design.
requestAction() a Last Resort
The tackiest way to retrieve model data is to use requestAction. The reason for this is because of how Cake works. As you can see from the diagram, the dispatcher determines the route and then loads a single controller along with its models. Using a request action will cause the dispatcher to run again (possibly re-running routes) and then loading your additional controller, along with its models. This can cause a performance hit without caching.
Inside your Users controller you have an action called show_notes(). show_notes needs to access the notes table and retrieve a list of notes.
// Users Controller
function show_notes() {
...
$notes = $this->requestAction('/notes/get_notes/'.$user_id);
}
// Notes Controller
function get_notes($user_id) {
return $this->findByUserId($user_id);
}
There are a number of problems with this type of design.
- Additional server load for every request, which may cause bottlenecks.
- It goes against the "fat model, skinny controller" concept
- You are redefining the controller to do what the models are supposed to do.
Put simply, there are plenty of options to retrieve model data. The method that you use truly depends on your specific problem that you are addressing.
Thursday, January 08, 2009
Using Git with SVN
Although git might generally be recognized as Southern slang, in web developing, "git" is one of the most useful applications for your local development environment. Git is a version control system similar to SVN or CVS, however using git is a bit different SVN or CVS. In this post, we will assume that you are familiar with version control systems, and you are currently using or have used SVN.
Learning Git
There is usually a little learning curve when looking into a new concept. Git is no different, however it is well worth the time investment to learn, because it will certainly save you time in the future. Here are the pro's and cons of learning git:
PRO's
Screencasts and tutorials are some of the best places to start to familiarize yourself with something new. Here is what I did to learn git:
Here is a development process to get you started with git with a project that you are already working on.
And it's that simple.
Using Git with SVN
Now that you know the basics of git, you can implement it alone, or within your SVN repository. Git only adds a single directory .git within the base of your application and it does not interfere with SVN. From the Git side, you will need to filter out .svn directories. The implementation is easy enough. Simply add the following line to the file: ".gitignore"
.svn
Basically the .gitignore file will allow git to ignore any matching file or directory. You can use wildcards to find more specific file matching.
At this point you will be able to use the git steps above within an SVN repository to keep up with your local changes without having to commit to the svn repository as much.
Why Use Git in SVN?
Using git inside of SVN has its advantages and disadvantages. One advantage is you gain the flexability of simple branching without having to download the entire repository from the SVN server. It is like adding tabs to a web browser. You can multi-task, branch and merge all locally, and then once your modification is tested and ready, simply SVN commit.
Let's look at an example.
I have an SVN repository setup in my development environment called /www/coolwebsite/ I created the git repository as described above and I setup my .gitignore. I have a 3 item project list for changes on the website.
git checkout -b t.home_page_design master
This says that I am going to create a new branch called 't.home_page_design' based on the 'master' copy, and I'm going to switch to that branch.
So 'git branch -l' should look like:
master
* t.home_page_design
Now let's start working on the project. I edit the home page and save it. I edit 2 css files and save them. Then I add 3 new images. I do a 'git status' and see:
$ git status
# On branch master
# Changed but not updated:
# (use "git add..." to update what will be committed)
#
# modified: index.html
#
# Untracked files:
# (use "git add..." to include in what will be committed)
#
# images/banner.gif
# images/logo.jpg
# images/test.gif
no changes added to commit (use "git add" and/or "git commit -a")
Now simply add and commit to the branch.
git add .
git commit .
If you're using TortoiseSVN you will find that the changes have become red in your file browser. This should reflect the changes that you've done in your files. Before committing to SVN, you first want to merge the changes back to the master branch.
git checkout master
git merge t.home_page_design
When you checked out the master, the red files in TortiseSVN should have turned green, but they should have turned red again when you did the merge. There should be no conflicts here and now the master branch should reflect all fo the changes of your branch. An additonal commit is not necessary.
It is now safe to publish your changes to the SVN Repository.
The next project is to create an email autoresponder. Again we make a new branch.
git checkout -b t.autoresponder master
This time as we start working on the autoresponder branch, our client comes to us and says that they need the contact us form built ASAP, and the other project needs to go on hold. We don't want to lose any of our changes to the autoresponder either. Git handles this quite well.
First commit all of your changes:
git commit -a
Second, create a new branch for the contact us form.
git checkout -b t.contact_us master
Now you can start on the contact us form and still hold on to the changes from the autoresponder. While you are editing and adding files, you will notice your changes reflected in TortoiseSVN. During the middle of a project you can easily switch branches and work on them without affecting any other branches.
You finish the contact us form, commit it to the branch and then merge to the master.
git commit -a
git checkout master
git merge t.contact_us
Now master has the contact us additions. Commit to SVN from the master branch, and then checkout t.autoresponder
git checkout t.autoresponder
Finish the autoresponder and commit the changes. Commit to SVN, and there you have it.
Final Thoughts
As you can see, there are some great advantages to using SVN with Git, and there are a few disadvantages. If you branch for every change, it will force you to keep tasks separate which could be a good thing or a bad one. There is a little bit of overhead during development to keep both repositories in sync, but the flexability that you gain is sure to outweigh any lost time.
Feel free to comment.
Learning Git
There is usually a little learning curve when looking into a new concept. Git is no different, however it is well worth the time investment to learn, because it will certainly save you time in the future. Here are the pro's and cons of learning git:
PRO's
- Increase productivity and speed in local developing - Git is fast and it works locally. Git allows you to take an entire project, copy it, totally trash it with debug code so you can get the task done, and then completely restore the original files almost instantly.
- Less hassle - Git's commands are purposefully easy. With one command you can commit all of your changes. With another single command you can create a new branch and immediately start working.
- Keeps you on track and focused - with the branching functionality of Git, you can work on two or three projects in the same code base at the same time. Switching between your code is almost as easy as Alt-Tab in windows.
- Git is powerful - Git's merging functionality is very quick, simple, and powerful. There are conflict resolution tools that help you to merge safely without breaking things. It also allows you to go back and fix mistakes and recover lost changes.
- Git is local - The entire repository for Git is contained in a .git directory in your root path. This means if you have a project with several hundred directories, you won't have hundreds of .svn or CVS directories. Just one .git directory.
- About the only con of Git is the intimidation factor. Currently there is no TortoiseGit to make the familiar transition from TortoiseSVN. The best way to use git on windows is to use the command line using MsysGit.
Screencasts and tutorials are some of the best places to start to familiarize yourself with something new. Here is what I did to learn git:
- Watch some screencasts - I started out with the free screencast from debuggable. It gives you a step by step process on how to setup Git along with examples of building a repository.
- Read the Documentation - Yeah I know, writing code is much more fun than reading about it, but hey, it's worth it. I would suggest reading and focusing on the first 3 chapters of the Git User's Manual. It will provide you with specific walkthroughs and examples of each concept.
- Do it yourself - Now you should be ready to start implementing git in your own projects.
Here is a development process to get you started with git with a project that you are already working on.
- Open the git bash window.
- Navigate to the root directory of your project.
cd /c/www/myproject - Set up your git repository in that folder.
git init - Set up any .gitignore files that you may want. Often this would be for tmp folders, dynamically generated files, or any .svn or CVS folders.
- Add and commit everything
git add .
git commit .
or
git commit -a . - Create a new development branch and switch to it.
git checkout master
git branch t.setup_test_cases
git checkout t.setup_test_cases
or
git checkout -b t.setup_test_cases master - Now you are safe to start coding your task. You are now working on a copy of your files, everything is backed up and recoverable. Add, Delete and Commit as you go, and everything will be stored to the branch.
7a. At any time during development you can repeat step 6 to create an additional branch to get a high priority item finished, then go back to your main project. You can also have two or three simaltanious projects open at once. - When you're done with your changes to a branch, simply merge back to the master.
git checkout master
git merge t.setup_test_cases
#Resolve any conflicts here
git status - Use gitk to examine your changes to see what happened.
And it's that simple.
Using Git with SVN
Now that you know the basics of git, you can implement it alone, or within your SVN repository. Git only adds a single directory .git within the base of your application and it does not interfere with SVN. From the Git side, you will need to filter out .svn directories. The implementation is easy enough. Simply add the following line to the file: ".gitignore"
.svn
Basically the .gitignore file will allow git to ignore any matching file or directory. You can use wildcards to find more specific file matching.
At this point you will be able to use the git steps above within an SVN repository to keep up with your local changes without having to commit to the svn repository as much.
Why Use Git in SVN?
Using git inside of SVN has its advantages and disadvantages. One advantage is you gain the flexability of simple branching without having to download the entire repository from the SVN server. It is like adding tabs to a web browser. You can multi-task, branch and merge all locally, and then once your modification is tested and ready, simply SVN commit.
Let's look at an example.
I have an SVN repository setup in my development environment called /www/coolwebsite/ I created the git repository as described above and I setup my .gitignore. I have a 3 item project list for changes on the website.
- change the design of the home page
- create an email autoresponder
- create a contact us form
git checkout -b t.home_page_design master
This says that I am going to create a new branch called 't.home_page_design' based on the 'master' copy, and I'm going to switch to that branch.
So 'git branch -l' should look like:
master
* t.home_page_design
Now let's start working on the project. I edit the home page and save it. I edit 2 css files and save them. Then I add 3 new images. I do a 'git status' and see:
$ git status
# On branch master
# Changed but not updated:
# (use "git add
#
# modified: index.html
#
# Untracked files:
# (use "git add
#
# images/banner.gif
# images/test.gif
no changes added to commit (use "git add" and/or "git commit -a")
Now simply add and commit to the branch.
git add .
git commit .
If you're using TortoiseSVN you will find that the changes have become red in your file browser. This should reflect the changes that you've done in your files. Before committing to SVN, you first want to merge the changes back to the master branch.
git checkout master
git merge t.home_page_design
When you checked out the master, the red files in TortiseSVN should have turned green, but they should have turned red again when you did the merge. There should be no conflicts here and now the master branch should reflect all fo the changes of your branch. An additonal commit is not necessary.
It is now safe to publish your changes to the SVN Repository.
The next project is to create an email autoresponder. Again we make a new branch.
git checkout -b t.autoresponder master
This time as we start working on the autoresponder branch, our client comes to us and says that they need the contact us form built ASAP, and the other project needs to go on hold. We don't want to lose any of our changes to the autoresponder either. Git handles this quite well.
First commit all of your changes:
git commit -a
Second, create a new branch for the contact us form.
git checkout -b t.contact_us master
Now you can start on the contact us form and still hold on to the changes from the autoresponder. While you are editing and adding files, you will notice your changes reflected in TortoiseSVN. During the middle of a project you can easily switch branches and work on them without affecting any other branches.
You finish the contact us form, commit it to the branch and then merge to the master.
git commit -a
git checkout master
git merge t.contact_us
Now master has the contact us additions. Commit to SVN from the master branch, and then checkout t.autoresponder
git checkout t.autoresponder
Finish the autoresponder and commit the changes. Commit to SVN, and there you have it.
Final Thoughts
As you can see, there are some great advantages to using SVN with Git, and there are a few disadvantages. If you branch for every change, it will force you to keep tasks separate which could be a good thing or a bad one. There is a little bit of overhead during development to keep both repositories in sync, but the flexability that you gain is sure to outweigh any lost time.
Feel free to comment.
Subscribe to:
Posts (Atom)